Click on the Edit Content button to edit/add the content.
Practical Things To Know Before You Begin
Treatment Tables
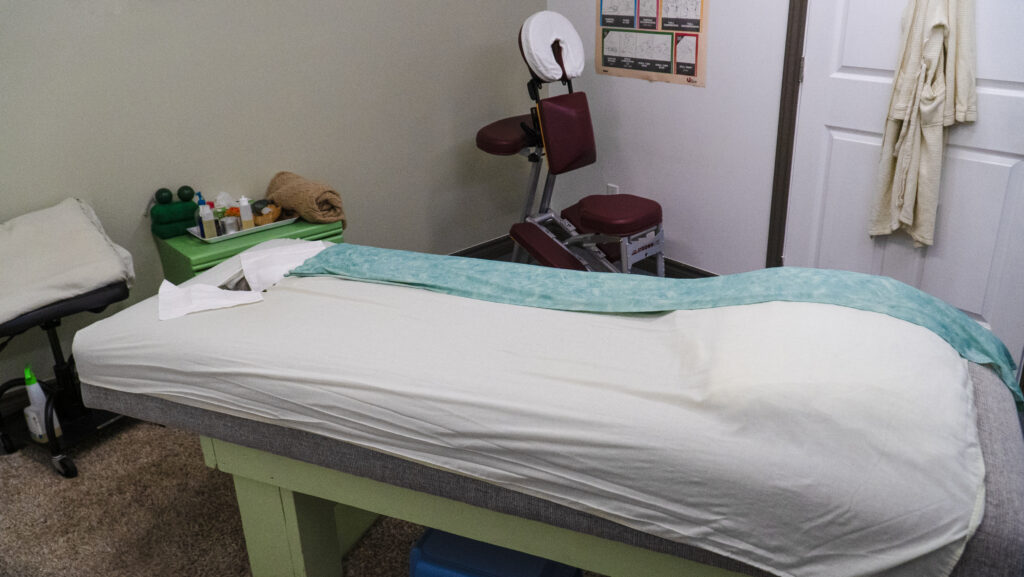
Prepping Your Table
Your table will require either a bottom sheet with a face hole, a bottom sheet and face covering or a bottom sheet with no face hole which in this case you can improvise the face hole with an airplane horseshoe pillow or a rolled towel as seen here.
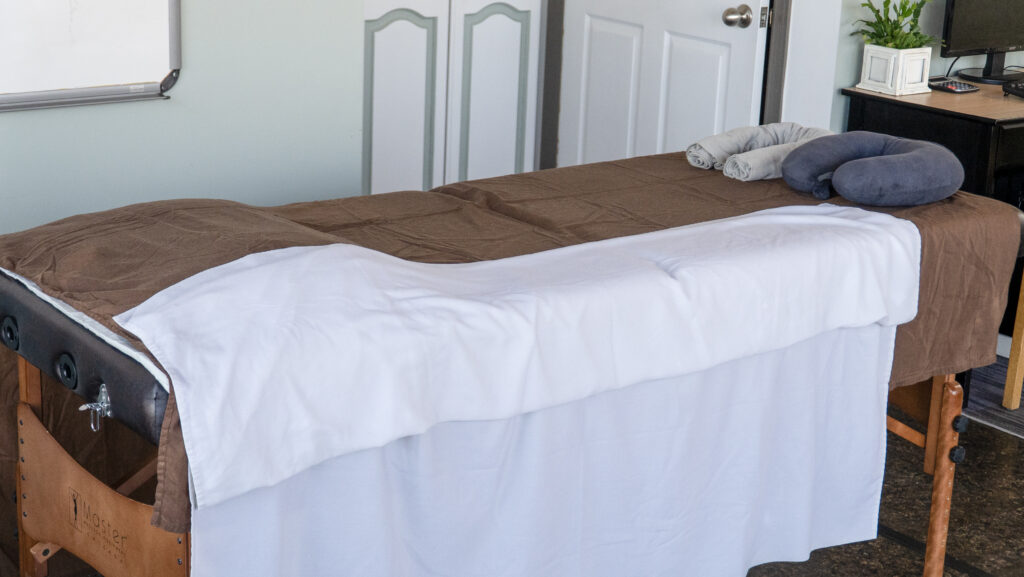
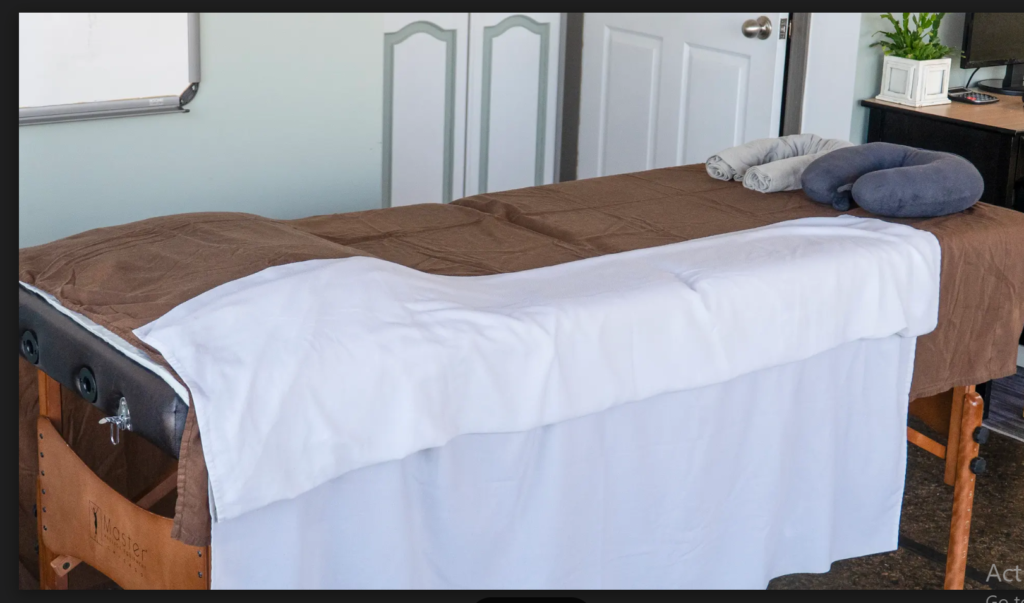
A top sheet folded over accordion style so the client can pull it over themselves easily.
Two pillows with covers. One pillow placed at the foot of the bed opposite the face hole to support ankles and the other pillow will be placed on a stool for later use once the client rolls onto their back.
Be sure to have a stool ready for you to sit down while working the head, neck and shoulders.
Notes on Care of Linens and Tables
Be sure to change linens and disinfect after each use.
Higher quality sheets are well worth the additional expense as they are washed often and have a longer shelf life.
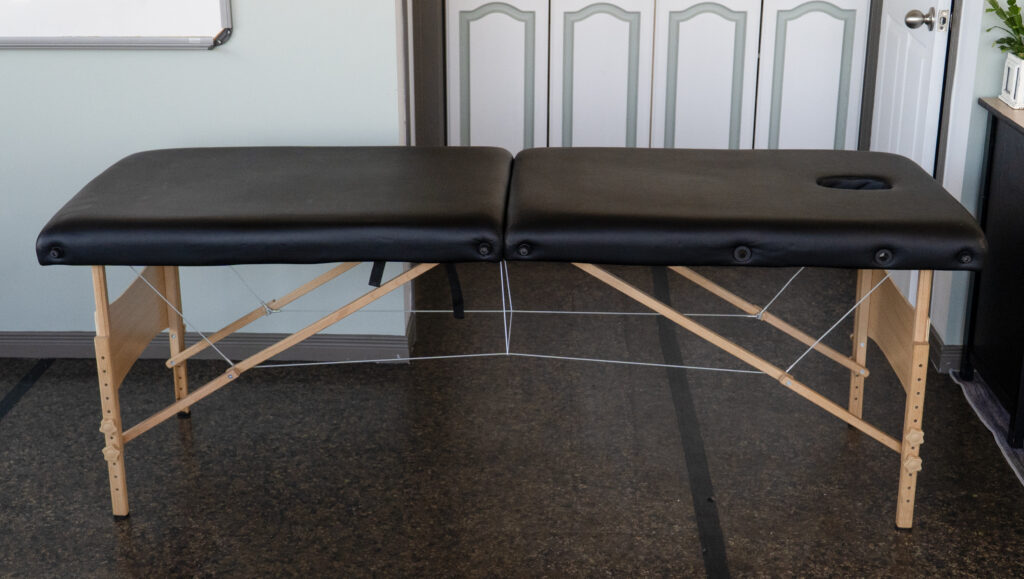
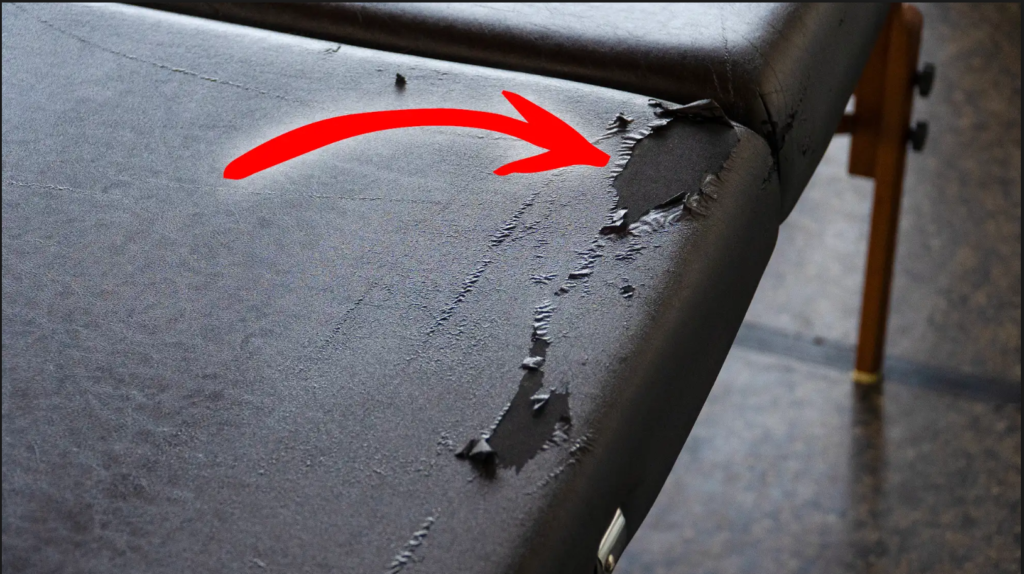
Note that Massage Oil will eat through the vinyl covering of portable beds over an extended period of time (see image). Wiping vinyl down after each client visit will prolong the life of your table.
Oils and Essences
The Biblical word anoint very often means to massage with oil. The ancient Jews used olive and vegetable oils to warm the skin of those they wished to bless. Over the past 5000 years no better massage oils have been discovered.
Vegetable oils, with the exception of peanut or corn will liquify into a smooth, almost odorless medium. Safflower oil is a less expensive alternative and is easier to use because it does not solidify at lower temperatures. Olive oil is non-allergenic to 99% of the population. Please exercise caution with Peanut and Tree Nut oils as your clients may be allergic to them.
Keep oil in a bottle or metal bowl that is less likely to tip over while you’re working on the client. You may want to use a coffee warmer or candle to heat the bowl so that you have warm oil throughout the treatment. If you have one, a plastic squeeze bottle will eliminate potential oil spills that occasionally annoy even the most experienced practitioner. In this case be sure to warm oils beforehand in a separate container as cold oils on warm skin will shock your client and disrupt the mood.
Once oil is warmed, you may scent it with an essence extract, or a few drops of fresh lemon juice. Scent determines mood just as surely as lighting, music, and touch will so be sure to pick your scent carefully.
If you do not have previous knowledge of aromatherapy we recommend that you use plain oil, as these oils can have adverse side effects if used in concentration.
Oil each section of your client’s body prior to massaging it. Oiling can be very delicate feeling – let the client relish in it. Pour oil into your hand and spread slowly using long even strokes (effleurage). Use just enough oil so that your hands move smoothly as too much oil will leave the client dripping. Hairy parts of the body will require more oil than smooth skin. Go easy on the head and hands. The oil should come off with a soft towel. Don’t forget to wipe off excess gently before your client turns over if you find there is excess.
Your Pre-Treatment Intake
Heart Conditions: Clients with leaky heart valves or bypass surgeries often should not lay on their stomach or back. Do treatment while the client lays on their side.It is very important to let your client know that you are a Deep Muscle Therapist and not an RMT (Registered Massage Therapist).RMT (Register Massage Therapy) Vs. DMT (Deep Muscle Therapy)
RMT is a designation as opposed to a type of massage technique. It indicates an individual is registered with the College of Massage Therapists in their province (currently consists of Ontario, British Columbia, Newfoundland and Labrador, New Brunswick and Prince Edward Island). These colleges have set out professional standards and quality of care guidelines that they hold RMTs accountable to through a complaints and discipline process if the services do not meet the standards of practice. Therefore a person can be an RMT and practice DMT however not all DMTs are RMTs.
Intake and Medical History Form
Have Your Client Fill Out an Intake (Medical History Form). A sample form is provided in the Resource Section of this course.
Things you need to consider relating to the Medical History Form:
Low/High Blood Pressure: If client blood pressure is too low it may drop at the beginning of their treatment. After a few treatments his/her body will become accustomed to the treatment procedure and blood pressure should normalize. Clients with very low blood pressure may have to be given 1/2 treatments in the beginning and work toward a full treatment.
Diabetes: Clients with diabetes should monitor sugars more often after a treatment as treatment may affect levels.
Thyroid Issues: If a client is just starting on thyroid medication, do not treat them until they are on a correct and stable dosage as a treatment will increase circulation, elimination and may give a false reading of levels.
Other Therapies: When possible you should discourage your client from having alternative therapies (if they say yes to this question) within 24-48 hrs. Spreading out therapies will give each treatment its full potential to benefit the client and any possible side effects will have time to resolve.
Pregnant Women: DO NOT work on women in their first trimester. With clients in the third trimester be sure to avoid any pressure to the lower back area.
NOTE: It has never been proven or disproven that DMT can cause a miscarriage however if a new mother does miscarry she may be inclined to blame anything new she has started doing ie. DMT treatments for the miscarriage. In order to protect yourself from any potential lawsuits or bad public relations/reputation it is very important to wait till the second trimester with expecting mothers.
Multiple Medications (more than 5): Is their pain/discomfort a side effect of one or more of the medications? Never advise a client to stop taking medications. Look up medications on Google or using the Drug Compendium and if symptoms correlate to what they are reporting refer them back to a Physician.
Cancer: At one time there was a belief that DMT could potentially cause the spread of cancer. This theory is NOT true. However, if you have concerns simply put the onus back on the client to clear this type of treatment with their oncologist before proceeding.
Potential Issues with Positioning:
Substances: Never judge your client’s choices for pain management. However, suggest they use any pain management substance after they are back home or to have a driver take them home as treatments may enhance the effects of pain medication. We do not want our clients operating a motor vehicle while potentially impaired. This suggestion will protect you if they choose to drive despite your warning.
Main Complaint and Expected Outcome(s): These 2 questions will pinpoint where your client feels pain (not necessarily the cause of the pain) A client may believe that a single treatment will “fix” the issue. This is a good place to begin examining any underlying issues:
Why are they in pain?
How long has it hurt?
Does anything make it feel better/worse?
On average, any issue that has been building for 3 years will take 3 months of treatment every 2 weeks to resolve. This is dependent on if the underlying cause is determined and stopped. Perhaps the client may need to come on a more frequent basis in order to begin resolving the acute issue however cannot stop what is causing the pain (for example repetitive movements that are part of their job). In cases such as this, the client may want to consider maintenance treatments every 4-6 weeks to mitigate the effects that led to the acute situation.
Disclaimer and Consent to Treatment: If the client is less than 16 years old a parent or guardian MUST sign for them. At age 16 clients will begin to sign for themselves and are in charge of their own medical history.
Policies: Make clients aware of any policies you may have regarding, cancellations, mobile phone use during treatments, children allowed in the treatment rooms and wait area.
Treatment Procedure
Learning the Treatment
Read through the entire treatment procedure
Before you begin:
Fill out intake form / medical history of the client (sample provided)
Explain benefits of DMT. Thoroughly explain side effects of DMT, reason for side effects and duration.
Tell the client how to climb onto the treatment table
Have your oil (olive oil) ready
You may play relaxing music quietly in the background
Tell your client to relax and enjoy, but to stop you should they feel any pain or significant discomfort.
BACK: (Reminder DO NOT work on your client’s spine)
Undrape the client to the waist
Work one side at a time starting with the left side
Work with an upward pressure, effleurage oil over the entire back, hands move from the buttocks to the neck and around shoulder blade giving a gentle pull on the shoulder
Thumb and finger pressure along the spine—buttocks to head
Alternate thumb kneading longitudinally along back in three channels. Hands move from head to buttocks with pressure in an upward motion (palm slide).
Work around shoulder blades, using thumb kneading or pressure pointing.
With side of thumb work under the edge of the scapula using a press and release motion.
Working horizontally on the back—shoulder blade to spine, intercostal region and lumbar region.
Pressure point crest of buttocks and palm drag from spine to side of body
Effleurage
Repeat above movements (3-10) on the opposite side now.
Effleurage using a crisscross motion over the entire back (push/pull technique)
Cover the client and gently stroke from head to buttocks
BUTTOCKS AND LEGS: (DO NOT work deeply on varicose veins)
Working one leg at a time
Undrape client so as not to expose buttocks
Effleurage area you are working on – always in an upward motion.
Effleurage over buttocks and around hip
With heel of hand work gluteal from upper thigh across buttocks to sacrum
Effleurage oil over upper thigh
Alternate thumb kneading down the centerline of the leg. DO NOT apply pressure to the back of the knee (this is a sensitive spot as is any place where skin touches skin)
With the palm of hands work the outer aspect of the upper thigh. (lunge)
Palm drag inner aspect of thigh while pressure pointing sacrum.
Knee Drain
Work all sides of the calf muscle either with the palm of your hands or thumb kneading. (Use what is comfortable to you)
Work calf muscle in a wringing motion (as though you were wringing out a towel)
With the heel of your hand work in circular motion around the ankle.
Work heel and sole of foot with gentle kneading action.
Strip the foot
Cover client and stroke on top of sheet to indicate they are covered
Repeat this process on the opposite leg (Steps 1-15)
Have the client roll over
Place a pillow under the client’s knees and head. Ensure they are warm enough and comfortable.
For this we start with one arm and move to the leg on the same side and then the other leg and arm (making a circular motion around the body)
ARM
Effleurage to the area being worked.
Work across the front of the collarbone.
Pressure point shoulder joint. (circle the joint with the heel of hand)
Finger pressure at back of shoulder—pump shoulder with one hand.
Work the outer upper arm. (with thumb kneading motion, palm drag, etc.)
Work the outer lower arm. (with thumb kneading motion, palm drag, etc.)
Open arm-V elbow to shoulder-close arm work inner side-wrist to elbow- thumb over thumb.
HAND
Work wrist.
With thumbs or fingers work channels between the bones of the hand on both the palmer and dorsal sides.
Cupping hand in yours, flex and contract the palmer region of the hand. This loosens the bones.
Milk the fingers or use a pulling/sliding motion on the fingers.
Cover arm and stroke.
FRONT OF LEG
Undrape client, exposing the upper thigh.
Effleurage oil over upper leg and around hip Palmer kneading on the joint.
Alternate thumb kneading along upper thigh on all three sides. You may use your palms.
Work around the knee.
Using finger pressure, work the front of the leg along the tibia and fibula.
Working with the heel of the hand, work around the ankle.
Effleurage the entire leg/hip.
FOOT
Using fingers or thumb gently rub the channels between the bones of the foot.
Knead the sole of the foot with your knuckles.
Using a crisscross motion work thumbs over the bottom of the foot.
Cupping foot in hands. Flex and contract body of the foot.
Cover leg and stroke on top of sheet.
(Repeat 3,4,1 and 2 (leg, foot, arm, hand) then go to the head/neck)
HEAD/NECK
Effleurage downside of neck and across chest, around edge of shoulders and up back of neck X3 on the last effleurage slide hands under client’s shoulders until fingers touch spine, with alternate finger kneading work along the vertebrae until reaching the occipital (notch at the base of the skull). Give neck a gentle but firm stretch. Previous video
Palpate (small circular motions) in a lateral movement across upper chest region
Drain
Take the client’s head in your hands and gently rotate to one side. Support the head with one hand and work with the other
Thumb stroking from just below ear to collar bone. Use a long smooth movement. Work the entire neck from the windpipe to the back of the neck. Can also use palm.
Effleurage with palm over side of neck and across collar bone to shoulder.
Gently pull the base of the skull with one hand and push the shoulder with free hand creating a stretching sensation.
Opening effleurage
(Repeat all 8 steps for the opposite side of the head)
FACE
Place your hand on either side of the client’s face with thumbs between the eyebrows.
Using light thumb pressure, work the forehead from the eyebrow to the hairline. Move laterally until the temple region has been reached.
With the palm of your hands drain forehead to temple area across temple to the front of the ears, under ears and down neck.
Finger pressure in the corner of eyes on the side of the nose. Hold and move across and under eyebrows following the bone line.
Pressure across the eyebrow.
Pressure along the bone of the bottom of the orbital.
Smooth out laterally with fingers.
Use finger pressure or slide across cheekbone to ear. Work both top and bottom of bone.
Smooth with palm of hands across bridge of nose, cheeks, under ear and down neck, around shoulder and up back of neck.
Work mustache area below nose to chin.
Thumb pressure along three aspects of chin bone to the ear.
With fingers gently pinch jaw line.
With palm of hand effleurage the entire face, neck, chest and shoulder region X3.
On the last effleurage grip base of skull and give a gentle pull, allow hands to slide out from under head.
END OF TREATMENT
(Encourage your client to get up slowly when they are ready, so they do not get a dizzy rush.)
Final Preparation Instructions
Please go back to the top and re-read the treatment procedure out loud so you hear the procedure.
If you are not happy with your own drawing you can also download a computer generated version.
At this point in the course you should have read the treatment procedure at least one time, watched all provided videos, heard how to do a treatment, and drawn a treatment.
You are now very close to being ready to start practicing. Before that however please take the time to review these videos and thoroughly study the movements shown in each:
Have everything prepared for when your volunteer arrives and although this is just practice go through the steps of an intake and the explanation of benefits and side effects. Read out loud or put into your own words the explanation to the client. Tell your client how to get onto the bed.
Ask the client to listen to your complete instructions and then afterwards you will leave the room as they prepare themselves for their treatment.
After the therapist leaves the room, the client should remove as many clothes as they are comfortable with. If they leave their bra on you will be unclasping it to work the back area and you will work just under the waistband of underwear. Ask the client to lay face down with feet on the pillow and face in the face-hole and cover with the top sheet as best as possible.
Leave the room and give your client a few minutes to prepare. During this time it is advisable for the therapist to wash their own hands and put themselves into a calm state of mind in preparation to give a treatment.
Always knock and get permission from the client to re-enter the room.
For your first attempt it is advisable to use whichever aid is best suited to your learning style
Do each movement once or twice. Do not work in an area too long! The ideal is to go through the motion and get a feel for the flow of the treatment. Remember you are learning and DMT allows for you to use a technique that is comfortable for you – the videos show a variety of techniques. You do not need to use all of them – pick one that is comfortable for you.
You’ve got this! Give your first treatment!
Over the course of the next few days while the treatment is fresh in your mind, it is recommended that you practice on both male and female volunteers. We highly recommend that you do at least three in your first week and one a week until you can arrange for your practical examination.
With each new treatment:
Try using your notes less and less.
Start to build your own style and pressure. As a therapist you should be able to feel the edge of the bones under the muscle you are working. If your back gets sore, check your posture.
Practical Exam
WHEN YOU BELIEVE YOU ARE READY You can make arrangements for your practical exam by contacting Touchstone at touchstone2024@gmail.com or calling (226) 622-565
You may travel to Brussels for this exam or a certified Touchstone instructor may be in your area and can administer the exam to you at an agreed upon location.
On this day bring your table, oils, etc. and a volunteer. The instructor will watch you give a treatment, guiding and correcting as necessary. Upon satisfactory completion a full treatment a certificate will be issued.
Mentorships are available to you by reaching out to Touchstone at any time.
CONGRATULATIONS!! YOU HAVE LEARNED THE BASICS OF DMT
You are invited to spend a day within our office job shadowing for a fee of $200. During this time you will learn advanced techniques and tricks of the trade.
Tailored to Your Needs
Discover our comprehensive range of flexible workspace solutions.
Lorem ipsum dolor sit amet, consectetur adipiscing elit. Ut elit tellus, luctus nec ullamcorper mattis, pulvinar dapibus leo.
Comfortability Work
0%
Community Active
0%
0
+
Coworking Space
Lorem ipsum dolor sit amet, consectetur adipiscing elit.
0
+
Virtual Office
Lorem ipsum dolor sit amet, consectetur adipiscing elit.
0
+
Our Location
Lorem ipsum dolor sit amet, consectetur adipiscing elit.
0Y
+
Our Experiences
Lorem ipsum dolor sit amet, consectetur adipiscing elit.
What We Do
Take advantage of our premium Working Space Services.
Lorem ipsum dolor sit amet, consectetur adipiscing elit. Ut elit tellus, luctus nec ullamcorper mattis, pulvinar dapibus leo.
Flexible Workspace Solutions
Lorem ipsum dolor sit amet consectetur
Virtual Office Service Solutions
Lorem ipsum dolor sit amet consectetur
Amenities and Resources Solutions
Lorem ipsum dolor sit amet consectetur
Collaboration Work Solutions
Lorem ipsum dolor sit amet consectetur
Meeting Place Office Solutions
Lorem ipsum dolor sit amet consectetur
Member Virtual Assistant Solutions
Lorem ipsum dolor sit amet consectetur
How Its Work
flexible booking step meet to your unique work requirements.
01
Membership Enrollment Process
Lorem ipsum dolor sit amet, consectetur
02
Booking Amenities and Resources
Lorem ipsum dolor sit amet, consectetur
03
Community Engagement Membership
Lorem ipsum dolor sit amet, consectetur
04
Flexible Workspace Utilization
Lorem ipsum dolor sit amet, consectetur
Hear from Our Members
Discover what our members have to say about their experience.
Lorem ipsum dolor sit amet, consectetur adipiscing elit. Ut elit tellus, luctus nec ullamcorper mattis, pulvinar dapibus leo.